Graphics Programming - Part 2: Your First Shader
First Shader
To learn shader programming, like most people, the first thing I did was Google “shader programming”. Immediately I was bombarded with terms like GLSL, HLSL, OpenGL, WebGL, Vulkan, compute shaders, and many more.
At first all these names felt pretty intimidating and confusing. I had no idea which ones were languages, which ones were APIs, which ones were engines, or whether I was supposed to learn all of them at once.
Thankfully, they actually fall into a few different categories, and once you understand how these pieces relate to each other, the graphics programming world starts feeling a lot less overwhelming.
The following diagram gives a quick high-level overview of the ecosystem before we dive into writing our first shader.
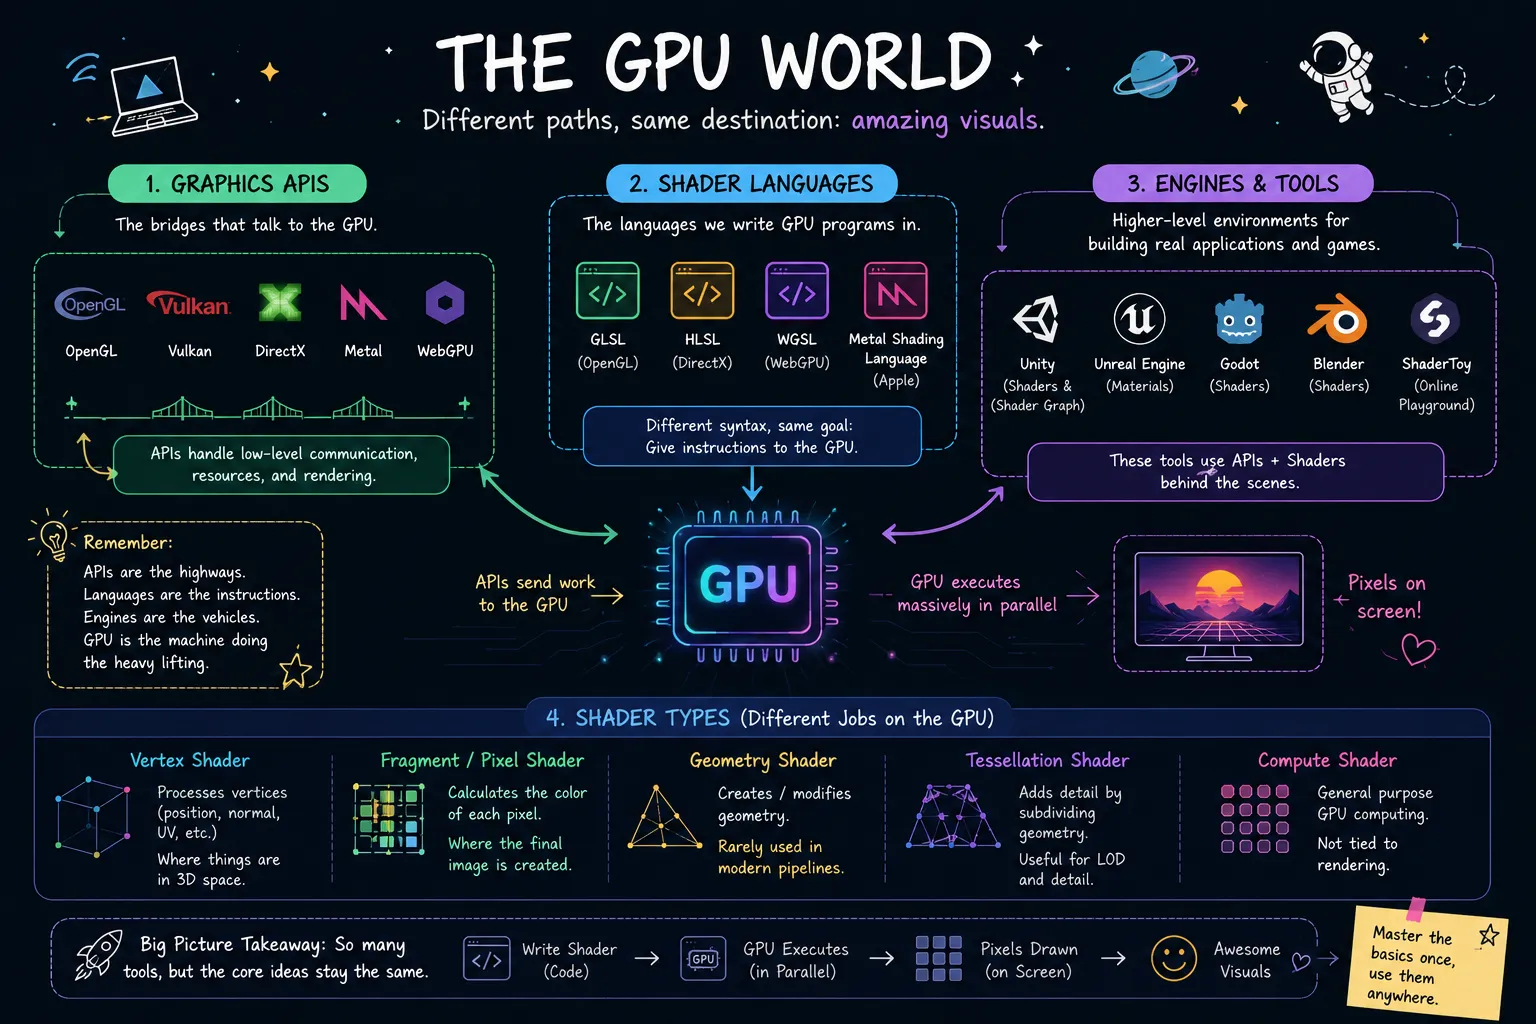
Image generated using ChatGPT
Play around with shaders
For some one who is getting started Shadertoy is the best platform to go to. the book of shaders also have an online GLSL editor if you want to play around shaders. Eventhough there are already awesome tools are out there, I also created (just because) a small shader playground
One of the best and most frustrating things about shader programming is that the output is usually visual.
When writing regular programs, you can often rely on things like print() statements, console logs, or debuggers to figure out what is happening. Shaders are a little different. While debugging tools do exist, when you are learning, the easiest way to understand a shader is often to simply change something and see what happens on the screen.
For someone who is just getting started, setting up a local graphics development environment can look a little daunting. But worry not, some very smart people have already built amazing tools that let you experiment with shaders directly in your browser.
I highly recommend checking out:
Even though these tools are already fantastic, I decided to build a small shader playground section of my own using WebGL to edit GLSL codes to make these articles a bit more interactive
Hello World?
Like every good programming tutorial, we should probably start by printing “Hello World”. Unfortunately, shaders don’t have a console to print text to, so our first shader won’t be greeting anyone today.
Instead, we’ll do the shader equivalent of “Hello World” and change the color of the screen.
As we discussed in the previous article, we can use Fragment Shaders to change the colors.
Remember that fragments are generated during the rasterization stage of the graphics pipeline and roughly correspond to pixels on the screen. A fragment shader runs for every fragment and decides what color that fragment should have.
So let’s get to work with a simple fragment shader
#version 300 es
precision highp float;

out vec4 outColor;

void main() {
    outColor = vec4(1.0, 0.0, 0.0, 1.0);
}
Before we break down the code, try playing with it first.
#version 300 es precision highp float;
out vec4 outColor;
void main() { outColor = vec4(1.0, 0.0, 0.0, 1.0); }
Feel free to change the values inside vec4() and see what happens. Try replacing some of the 1s and 0s with other values between 0.0 and 1.0.
You may have already noticed that changing the first three values changes the color on the screen.
That’s because the values inside vec4() represent:
Red, Green, Blue, Alphaor more commonly:
RGBAThe first three values control the amount of red, green, and blue in the final color.
For example:
vec4(1.0, 0.0, 0.0, 1.0);produces red.
vec4(0.0, 1.0, 0.0, 1.0);produces green.
vec4(0.0, 0.0, 1.0, 1.0);produces blue.
You can also mix colors together:
vec4(1.0, 1.0, 0.0, 1.0);produces yellow, while:
vec4(1.0, 0.0, 1.0, 1.0);produces magenta.
At this point you have already learned one of the most important ideas in shader programming:
The fragment shader decides the color of pixels by outputting RGBA values.
What About Alpha?
The fourth value is called Alpha and usually controls transparency.
Naturally, the first thing most people do is try this:
vec4(1.0, 0.0, 0.0, 0.0);and then wonder why nothing happened.
The reason is that transparency only matters when something is using that alpha value. In our simple playground, we’re just drawing colors directly to the screen, so changing alpha won’t have any visible effect yet.
We’ll come back to alpha, transparency, and blending in a future article.
For now, you can think of RGBA as:
R = Red
G = Green
B = Blue
A = Transparency
Breaking Down the Shader
#version 300 es
This tells the GPU which version of GLSL we are using.
If you’ve ever copied shader code from a random forum post from 2012 and wondered why it doesn’t compile, different GLSL versions are often the reason.
For this series, we’ll be using GLSL ES 300, which is supported by WebGL 2.0.
precision highp float
This tells the GPU how much precision to use for floating-point numbers.
You’ll see this line in almost every WebGL shader. For now, you can think of it as:
“Please use reasonably accurate decimal numbers.”
We’ll happily ignore it for the rest of this article.
out vec4 outColor
This declares an output variable.
At the end of the shader, we need somewhere to write the final color of the pixel. That’s exactly what outColor is for.
void main()
Just like in many programming languages, shaders have a main() function.
This is the entry point of the shader and the code inside it runs for every fragment being processed.
outColor = ...
Finally, this line tells the GPU what color should be written to the output.
Understanding out vec4
Before we finish, let’s break down this line one last time:
out vec4 outColor;This line contains three parts:
out vec4 outColorouttells GLSL that this variable is an output from the shader.vec4is the variable’s data type.outColoris the variable name.
Since this is a fragment shader, we need somewhere to store the final color that should appear on the screen. That’s exactly what outColor is used for.
The out keyword isn’t unique to fragment shaders. As we explore more shader types later in the series, you’ll also encounter things like in variables that receive data from earlier stages of the graphics pipeline.
For now, all you need to remember is:
Whatever color we write to
outColorbecomes the final color of the pixel.
What is vec4?
The vec4 data type represents a vector containing four floating-point values.
You can think of it as a container that holds four numbers:
vec4(x, y, z, w)In our case, we’re using those four values to represent:
vec4(red, green, blue, alpha)GLSL also provides several other vector types:
float    // One value
vec2     // Two values
vec3     // Three values
vec4     // Four values
For example:
float brightness = 0.8;
vec2 uv = vec2(0.5, 0.5);
vec3 color = vec3(1.0, 0.0, 0.0);
vec4 colorWithAlpha = vec4(1.0, 0.0, 0.0, 1.0);
Wrapping Up
Congratulations! You’ve officially written your first fragment shader.
It might not look particularly impressive yet, but you’ve already done something pretty cool: you’ve told the GPU what color every pixel on the screen should be.
In the next article, we’ll stop giving every pixel the same color and start treating pixels differently based on their position on the screen.